Snapshotting SwiftUI Views on macOS (Three Approaches and an ImageRenderer Gotcha)
Apr 26th, 2026You have a SwiftUI view on macOS and you want to turn it into an NSImage for some downstream use: a tab preview, a thumbnail cache, an offline export… This post walks through the three pipeline designs, when each one fits, and where the sync-vs-async trade-off shows up.
Approach 1 — cacheDisplay(in:to:) on an Already-Rendered Live View
If the view you want to snapshot is already on screen, ask it to copy its already-drawn pixels into a bitmap.
@MainActor
func snapshotLiveView(_ view: NSView) -> NSImage? {
    guard view.bounds.width > 0, view.bounds.height > 0 else { return nil }
    guard let rep = view.bitmapImageRepForCachingDisplay(in: view.bounds) else { return nil }
    view.cacheDisplay(in: view.bounds, to: rep)
    let image = NSImage(size: view.bounds.size)
    image.addRepresentation(rep)
    return image
}
‼️The view must already be on screen. This approach copies pixels from a view that is already laid out and drawn into its layer. If you are starting from a view value that has never been mounted, see Approach 3.
How cacheDisplay works
cacheDisplay(in:to:) is an NSView method that asks the view to draw its current contents into a provided bitmap. It is a synchronous operation. For a layer-backed NSHostingView it draws the existing layer tree. Under the hood it is essentially CALayer.render(in:) plus the AppKit to wrap an NSBitmapImageRep.
Variation: CALayer.render(in:) instead of cacheDisplay(in:to:)
You can swap the drawing API for CALayer.render(in:), which renders the layer tree into any CGContext you provide:
guard let rep = NSBitmapImageRep(...),
      let ctx = NSGraphicsContext(bitmapImageRep: rep) else {
    return nil
}
ctx.cgContext.translateBy(x: 0, y: view.bounds.height)
ctx.cgContext.scaleBy(x: 1.0, y: -1.0)
view.layer?.render(in: ctx.cgContext)
For a layer-backed view, this is functionally the same operation as cacheDisplay(in:to:). Both draw the existing layer tree. cacheDisplay is the higher-level wrapper that creates the bitmap rep for you and handles the coordinate flip. Reach for render(in:) if you want more control over the destination context (a different size, a transform, compositing into an existing context). For straightforward snapshotting, prefer cacheDisplay.
Optional performance optimization: push setup work to a background queue
The work in this pipeline splits into three buckets:
- SwiftUI layout: must run on main (already done — the view is on screen)
- Drawing (
cacheDisplayorrender(in:)): must run on main; touches the layer tree - Bitmap allocation, post-processing/resize: no main-thread requirement
The shape: an orchestrator on a bg queue calls down into a synchronous helper. The helper allocates the bitmap on bg, internally hops to main for the drawing step, then resizes back on bg.
func renderSnapshot(
    view: @escaping () -> NSView?,
    targetSize: NSSize,
    completion: @escaping (NSImage?) -> Void
) {
    guard let bounds = view()?.bounds else { completion(nil); return }

    DispatchQueue.global(qos: .userInitiated).async {
        guard let resized = createResizedImage(from: view, bounds: bounds, targetSize: targetSize) else {
            DispatchQueue.main.async { completion(nil) }
            return
        }
        DispatchQueue.main.async { completion(resized) }
    }
}

private func createResizedImage(
    from view: @escaping () -> NSView?,
    bounds: CGRect,
    targetSize: NSSize
) -> NSImage? {
    guard let bitmapRep = NSBitmapImageRep(/* ...size: bounds.size... */) else { return nil }
    renderView(view, to: bitmapRep, size: bounds.size)       // main hop happens inside

    let image = NSImage(size: bounds.size)
    image.addRepresentation(bitmapRep)
    return image.resized(to: targetSize)
}

private func renderView(_ view: @escaping () -> NSView?, to bitmapRep: NSBitmapImageRep, size: CGSize) {
    DispatchQueue.main.sync {
        guard let ctx = NSGraphicsContext(bitmapImageRep: bitmapRep) else { return }
        ctx.cgContext.translateBy(x: 0, y: size.height)
        ctx.cgContext.scaleBy(x: 1.0, y: -1.0)
        view()?.layer?.render(in: ctx.cgContext)
    }
}
A few things worth absorbing from this shape:
- The bg→main→bg ladder lives inside
renderView. Callers don’t see it. createResizedImageis itself synchronous. Async-ness is a property of the orchestrator, not the helper.
With this setup, the actual drawing still blocks main. You’re shaving the bitmap allocation and the resize off the main-thread budget.
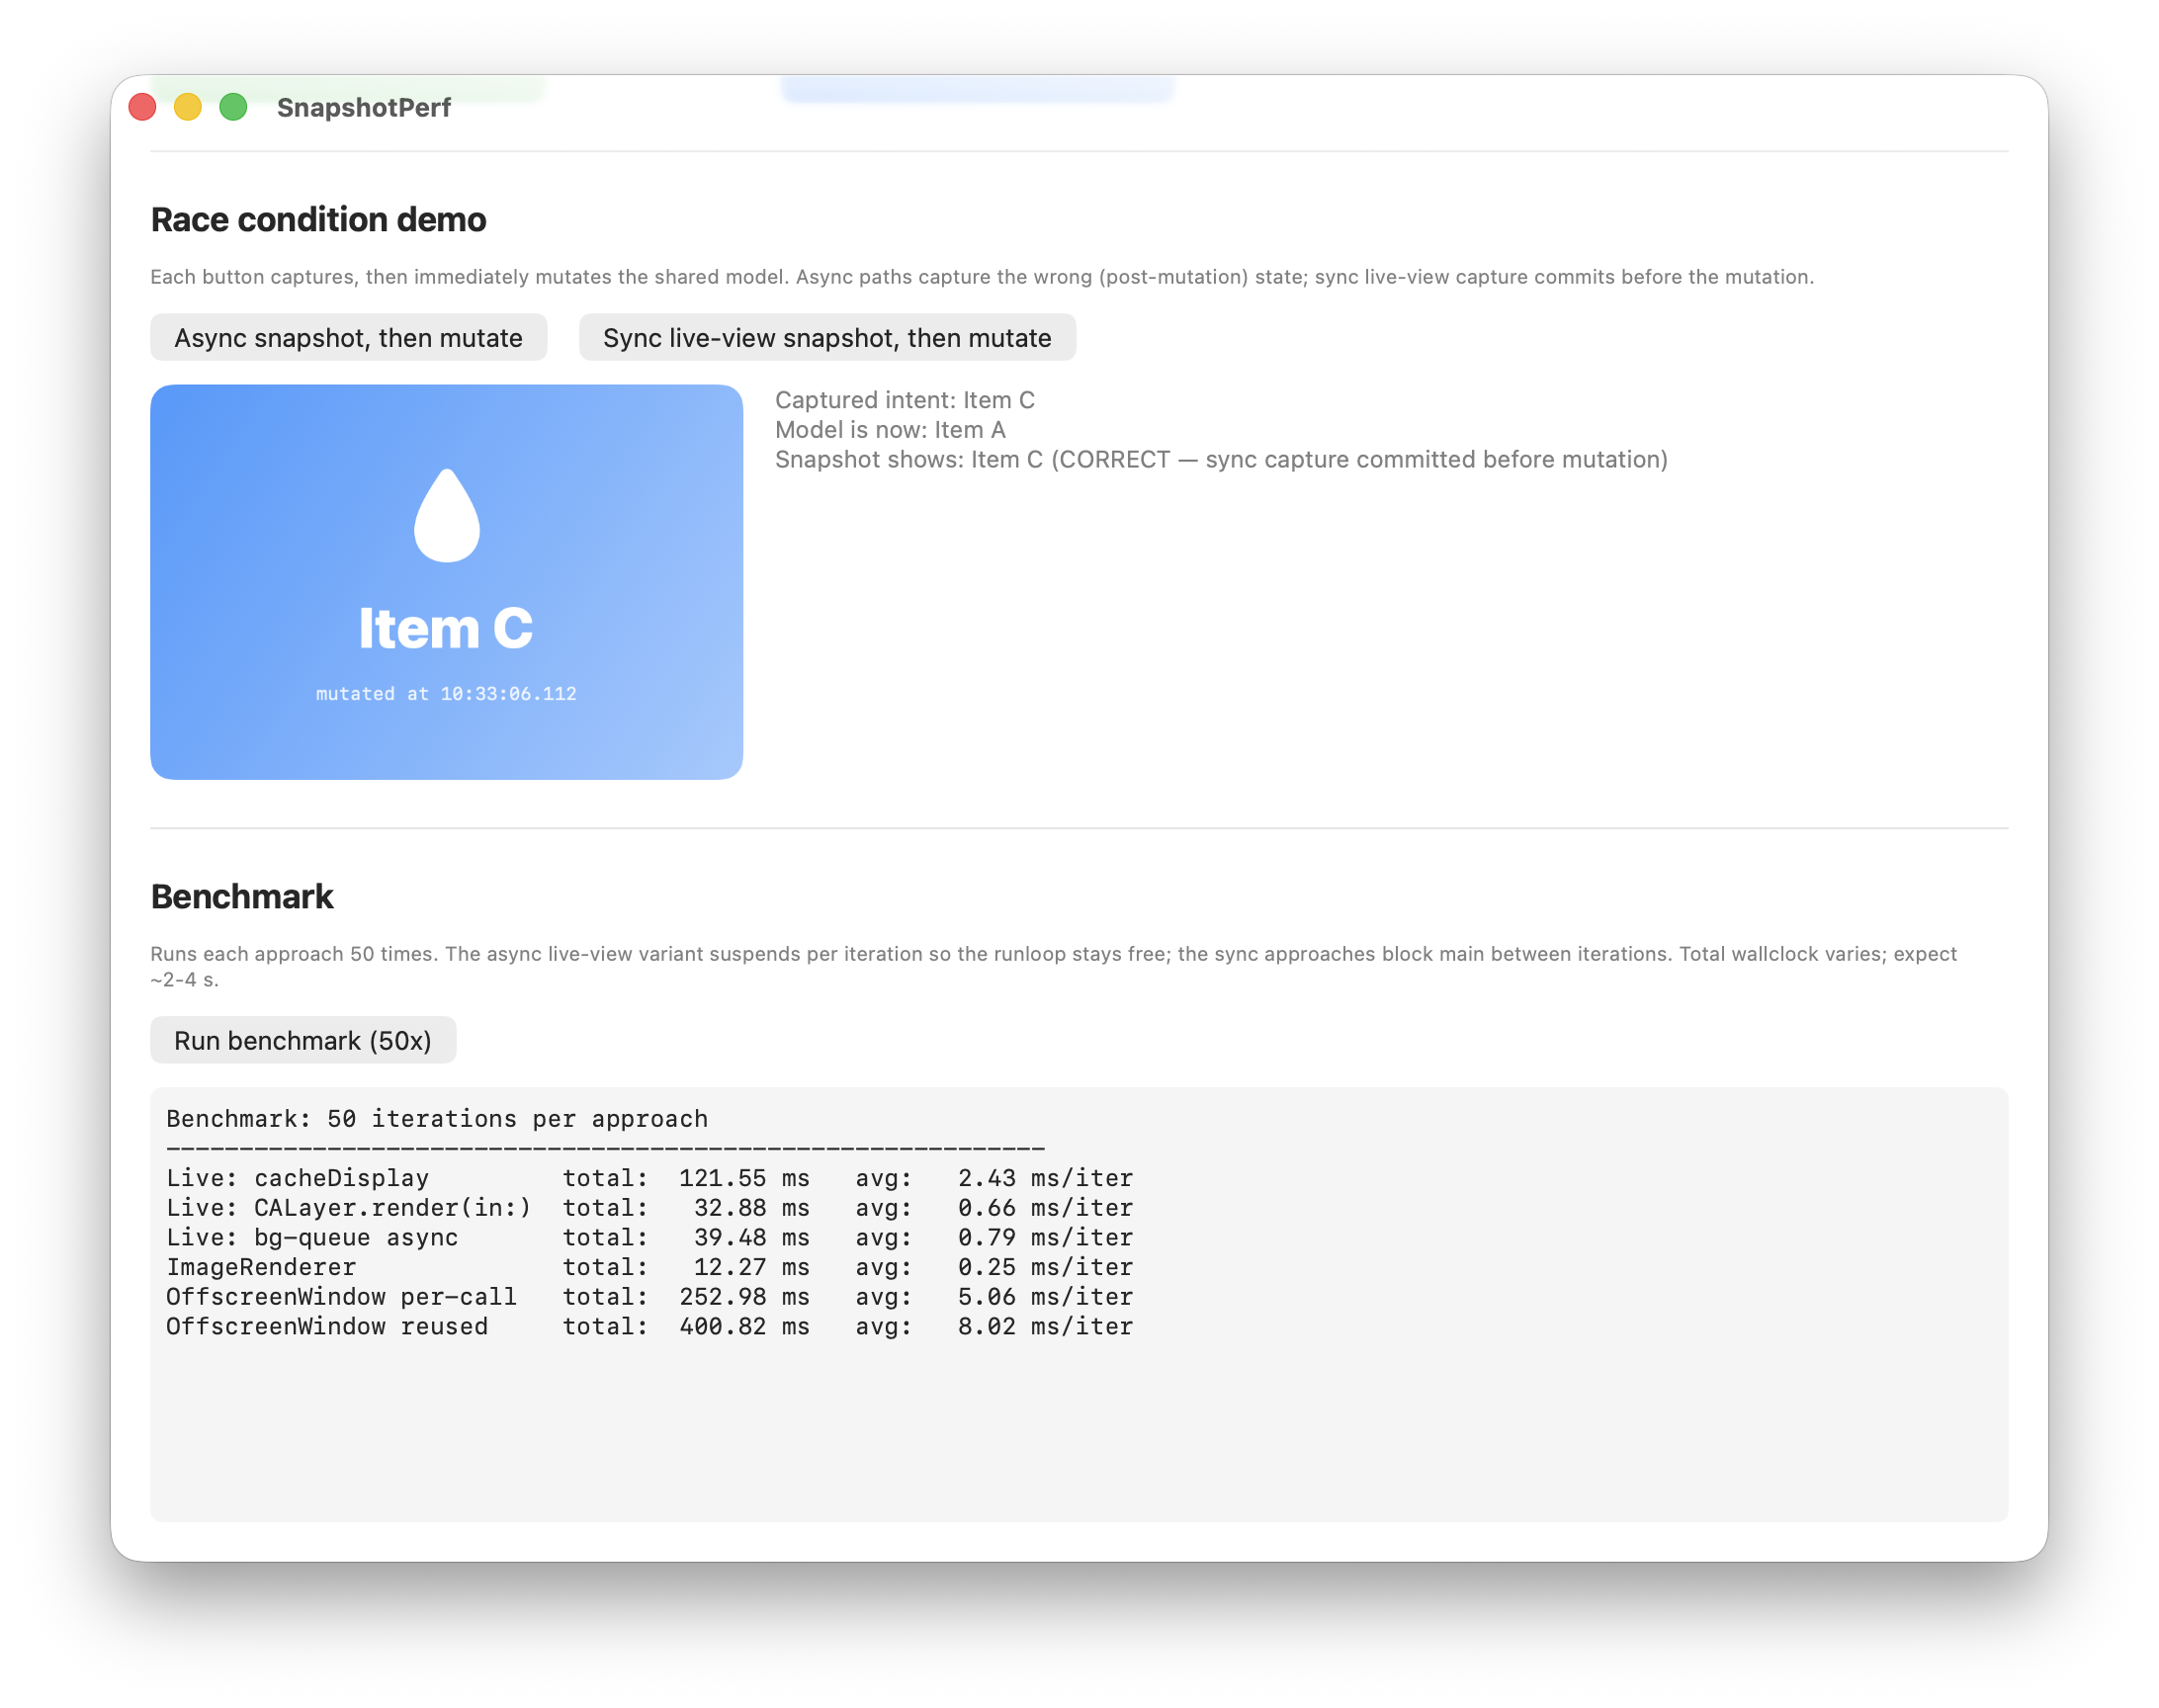
‼️The trade-off. Any async hop between scheduling and drawing is a window for shared state to change underneath the snapshot. If the data driving the view can mutate during that hop, the bitmap may capture post-mutation state. The perf savings come at the cost of a race window. If you take this path, freeze the source data before scheduling, or guarantee the view’s source can’t change in flight.
Pros
- Zero new views. Operates on the live on-screen view.
- Works with any layout container.
GeometryReader,ScrollView, nested anything. The view is already laid out, so nothing needs to re-resolve. - Works on all macOS versions.
Cons
- Only applies when the view is already rendered. If you need to snapshot a view value that’s never been on screen, you need one of the other approaches.
- Captures at the live view’s bounds and the screen’s backing scale.
- Not faster than
ImageRenderer. The selling point is code shape and the fact that the view is already laid out, not raw drawing speed.
When to use
- Tab previews, thumbnail capture, scroll-position snapshots: anywhere the view is live on screen
- You want the snapshot to reflect exactly what the user is seeing
- Any macOS version
Approach 2 — ImageRenderer (macOS 13+)
Apple’s SwiftUI-native renderer. No window required.
@available(macOS 13.0, *)
@MainActor
func snapshotViaImageRenderer<V: View>(_ view: V, size: NSSize) -> NSImage? {
    let renderer = ImageRenderer(content: view.frame(width: size.width, height: size.height))
    renderer.proposedSize = .init(width: size.width, height: size.height)
    renderer.scale = NSScreen.main?.backingScaleFactor ?? 2.0
    return renderer.nsImage
}
‼️ ImageRenderer fails silently. When it can’t resolve content, it returns a non-nil but blank NSImage. Verify visually before trusting any ImageRenderer output.
The GeometryReader + ScrollView gotcha
ImageRenderer returns a non-nil blank NSImage even when it can’t resolve the content. A view wrapped in a root GeometryReader { ScrollView { ... } } produces a non-nil but visually empty image: the background color draws, but the inner content is missing.
A view shaped like this hits the bug:
var body: some View {
    GeometryReader { geometry in
        ScrollView {
            VStack { /* card content */ }
                .frame(maxWidth: .infinity, minHeight: geometry.size.height)
        }
        .background(backgroundColor)
    }
}
The cause: GeometryReader reports a zero-size geometry inside ImageRenderer’s context. ScrollView’s inner VStack then has no room, so nothing lays out. The ScrollView.background(...) still paints across the proposed size, which is why the final image has color but no content.
Workaround: extract the renderable core
If you must use ImageRenderer on a view that has a root GeometryReader / ScrollView, factor out the inner content into a sibling struct that doesn’t use either. The live view keeps its outer wrapper; the snapshot path renders the flat inner view directly with an explicit frame.
struct OuterView: View {
    var body: some View {
        GeometryReader { geometry in
            ScrollView {
                InnerContentView()
                    .frame(maxWidth: .infinity, minHeight: geometry.size.height)
            }
            .background(backgroundColor)
        }
    }
}

struct InnerContentView: View {
    // The actual content, with no GeometryReader, no ScrollView.
}

// Snapshot path:
let image = snapshotViaImageRenderer(InnerContentView(), size: size)
Pros
- No window allocation, minimal setup
- Clean, SwiftUI-native API
- Good for export / one-shot scenarios
Cons
- Requires macOS 13+
- Blocks the main thread for the entire layout + render pipeline.
ImageRendereris@MainActor, so there’s no bg-queue split available. - Produces full-size × scale bitmaps. A 1200×800pt view at 2× scale is ~2400×1600 px ≈ 15 MB uncompressed. No built-in resize.
- Silent failures: a blank image looks like a success
When to use
- Simple one-shot exports where main-thread blocking is acceptable
- Small views, or views you intend to display at render size
- macOS 13+ only; you control the view and can avoid
GeometryReader/ScrollViewat the root
Approach 3 — Off-Screen NSWindow
The classic but legacy AppKit pattern, used when your view isn’t on screen yet — you only have a view value. The shape: build a fresh NSHostingView, attach it to an off-screen NSWindow so SwiftUI lays it out and the layer tree fills in, then run Approach 1’s cacheDisplay pipeline on the resulting NSHostingView.
@MainActor
func snapshotViaOffscreenWindow<V: View>(_ view: V, size: NSSize) -> NSImage? {
    let hostingView = NSHostingView(rootView: view)
    hostingView.frame = NSRect(origin: .zero, size: size)

    let window = NSWindow(
        contentRect: NSRect(origin: NSPoint(x: -10000, y: -10000), size: size),
        styleMask: .borderless,
        backing: .buffered,
        defer: true
    )
    window.isReleasedWhenClosed = false
    window.alphaValue = 0
    window.contentView = hostingView
    window.orderBack(nil)
    hostingView.layoutSubtreeIfNeeded()
    defer { window.close() }

    // From here: Approach 1's cacheDisplay pipeline on hostingView.
}
❓Why you need the off-screen window: A bare NSHostingView that’s never attached to a window will lay out but doesn’t go through the window’s display cycle, so its backing layer isn’t reliably populated for rendering. Attaching it to an off-screen window triggers the display pipeline that fills in the layer’s contents.
‼️Don’t forget to close the window. With isReleasedWhenClosed = false, the window sits in NSApp.windows for the lifetime of the app unless you explicitly call close(). The defer { window.close() } above is load-bearing.
‼️Other safeguards worth including to hide the window from the user:
window.level = .init(-1)                                   // below everything
window.ignoresMouseEvents = true                           // no interaction
window.isExcludedFromWindowsMenu = true                    // hidden from Window menu
window.collectionBehavior = [.transient, .ignoresCycle]    // excluded from Mission Control, Cmd+`
Small perf optimization: reuse the window
Allocating an NSWindow per snapshot is the heaviest line in this pipeline. If you snapshot frequently — thumbnail caches, batch exports, periodic refresh — keep one window around and swap its contentView each time:
let snapshotWindow: NSWindow = makeOffscreenWindow(size: ...)   // alloc once

func snapshot<V: View>(_ view: V, size: NSSize) -> NSImage? {
    let hostingView = NSHostingView(rootView: view)
    hostingView.frame = NSRect(origin: .zero, size: size)
    snapshotWindow.contentView = hostingView
    snapshotWindow.orderBack(nil)
    hostingView.layoutSubtreeIfNeeded()
    // ...Approach 1's cacheDisplay pipeline on hostingView...
}
This skips the per-call NSWindow allocation, which dwarfs the NSHostingView cost. You pay the window cost once at app start (or first snapshot), then every subsequent snapshot is just a hosting-view swap and a layout pass.
Variation and bg-queue optimization
The actual drawing step (bitmapImageRepForCachingDisplay + cacheDisplay), the CALayer.render(in:) variation, and the bg-queue split that pushes bitmap alloc + resize off main are all the same as in Approach 1.
Pros
- Works on all macOS versions
- Works with any SwiftUI view (no container caveats)
- Familiar AppKit pattern; few moving parts in the simple form
Cons
- Allocates an
NSWindowper snapshot unless you reuse one - The
NSWindowleaks intoNSApp.windowsif you forget toclose()it - The off-screen layout pass adds latency vs. Approach 1
- Same race-window trade-off as Approach 1’s bg-queue variant if you adopt it
When to use
- You need to snapshot a view that doesn’t exist on screen yet (you’re constructing it from a view value)
- macOS 11/12 where
ImageRendereris unavailable
Related Reading
- How to render SwiftUI view off screen? — Apple Developer Forums thread on the off-screen window pattern.
- SwiftUI Renderers and Their Tricks — covers
ImageRendererand lower-level rendering. - Export SwiftUI views as images in macOS — Approach 3 walkthrough.
- Take screenshots of SwiftUI Views — general
NSHostingView+ off-screen pattern. - How to take a snapshot image of a view in SwiftUI — pragmatic Approach 2/3 walkthrough.
- Apple Developer docs —
NSView.cacheDisplay(in:to:)andNSView.bitmapImageRepForCachingDisplay(in:)— the primitives powering Approach 1 (and the rasterization step of Approach 3).